
Embarking on an Eth 2.0 Raspberry Pi Journey: A Comprehensive Guide
Are you intrigued by the world of Ethereum 2.0 and looking to dive into the exciting realm of blockchain technology using a Raspberry Pi? You’ve come to the right place. In this detailed guide, we’ll explore the ins and outs of setting up an Eth 2.0 node on your Raspberry Pi, covering everything from hardware requirements to software installation and maintenance.
Understanding Ethereum 2.0
Ethereum 2.0, also known as Eth 2.0, is the highly anticipated upgrade to the Ethereum network. It aims to improve scalability, security, and sustainability by transitioning from a Proof of Work (PoW) to a Proof of Stake (PoS) consensus mechanism. As a user, you can participate in this transition by running an Eth 2.0 node on your Raspberry Pi.

Hardware Requirements
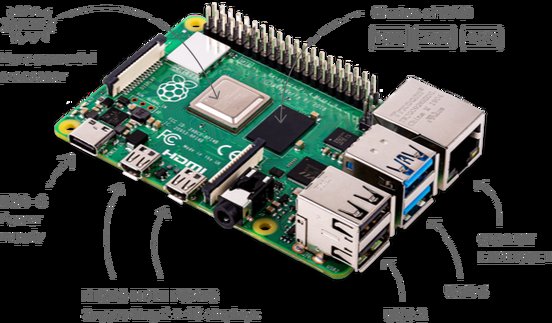
Before you start, ensure your Raspberry Pi meets the following hardware requirements:
| Component | Minimum Requirement |
|---|---|
| Processor | Raspberry Pi 4 Model B or higher |
| Memory | 4GB RAM |
| Storage | 32GB microSD card |
| Power Supply | 5V 3A microUSB power supply |
Additionally, you’ll need a monitor, keyboard, and mouse to interact with your Raspberry Pi.
Software Installation
Once you have your hardware ready, it’s time to install the necessary software. Follow these steps:
- Format your microSD card using a tool like Etcher.
- Download the Raspberry Pi Imager and select the “Ethereum 2.0 Raspberry Pi image” from the official website.
- Write the image to your microSD card and insert it into your Raspberry Pi.
- Connect your Raspberry Pi to a monitor, keyboard, and mouse, and power it on.
- Follow the on-screen instructions to set up your Raspberry Pi.
- Connect your Raspberry Pi to the internet using a wired or wireless connection.
- Install the latest version of Raspbian OS by running the following command in the terminal:
sudo apt updatesudo apt upgrade
Joining the Eth 2.0 Network
Now that your Raspberry Pi is set up, it’s time to join the Eth 2.0 network. Follow these steps:
- Install the necessary dependencies by running the following command:
sudo apt install git curl
- Clone the Eth 2.0 Raspberry Pi repository by running:
git clone https://github.com/ethereum/eth2.0-deployment-raspberry-pi.gitcd eth2.0-deployment-raspberry-pi
- Configure your node by running:
./configure.sh
- Start your node by running:
./start.sh
Your Raspberry Pi is now part of the Eth 2.0 network, and you can start earning rewards by participating in the staking process.
Maintenance and Monitoring
Maintaining your Eth 2.0 node is crucial to ensure smooth operation. Here are some tips:
- Regularly update your Raspberry Pi’s software by running:
sudo apt updatesudo apt upgrade
- Monitor your node’s performance using tools like monitor.sh.
- Keep an eye on your node’s storage and memory usage to prevent any potential issues.
- Backup your node’s data regularly to ensure